
CO2 fractional laser machine
Carbon dioxide fractional laser, the gold standard for acne scar treatment, is safe, effective and has fewer complications and is widely recognized
Key Words:
CO2 fractional laser machine
Category:
Co2 Fractional Laser/Laser Vaginal Tightening
Top Sellers
New Product
ODM
Hot Sales
WhatsApp:
Email:
CO2 fractional laser machine
Fractional laser
The principle of carbon dioxide fractional laser is to emit laser in a scanning lattice manner. The laser can penetrate into the dermis and stimulate part of the dermal tissue. Through the action of light and heat, it prompts the skin to start the repair process, stimulating epidermal regeneration, tissue repair, and collagen rearrangement. Wait for a series of reactions. For therapeutic purposes, carbon dioxide fractional laser can be used to repair skin tissue and improve skin smoothness.
In addition, the tiny pores created during the application of this technology can significantly increase the permeability of drugs, thereby facilitating drug absorption. Carbon dioxide fractional laser transdermal drug delivery technology has become a new way of external dermatology treatment.
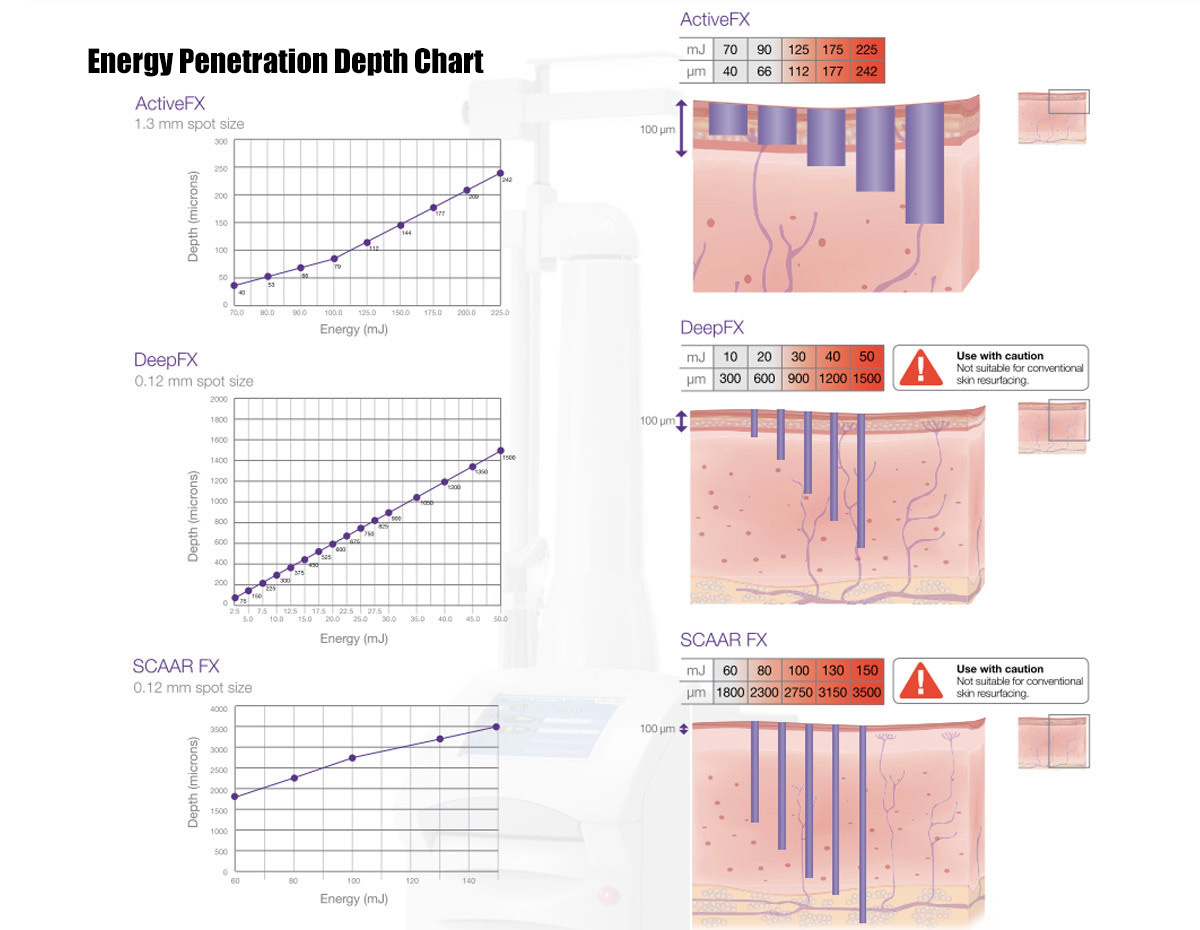
Indications
Carbon dioxide fractional laser is a commonly used instrument in clinical cosmetic medicine. In addition to treating acne scars, burn scars, and traumatic scars, it also has a good effect on facial rejuvenation, freckle removal, skin beautification, pore shrinkage, and stretch marks.
Fractional laser treatment has a wide range and is suitable for all ages and skin types;
Such as: acne scars (acne scars, acne marks), repair of superficial scars, enlarged pores, dark complexion, fine facial wrinkles, stretch marks, facial rejuvenation, moles, flat warts, common warts, and various skin growths.
Effect
Fractional laser is mainly suitable for treating superficial scars, atrophic scars, large pores, acne scars, and also has a certain effect on improving stretch marks.
Fractional laser acne scar removal:
The improvement effect of fractional laser on acne scars is clear. As for whether it can be completely removed, it depends on the individual skin condition and the severity of the acne scars. It will have an effect once it is done.
Depending on the severity of the acne scars, it is generally necessary to do it 3 to 5 times.
The interval between each treatment depends on which type of fractional laser you are doing:
The recommended interval for ablative fractional laser treatment is 3 to 6 months, because it takes about 3 to 6 months for collagen to regenerate inside the skin;
Non-ablative fractional laser has a shorter interval. But the specific doctor's advice is required, and the interval time varies according to individual conditions.
Fractional laser facial rejuvenation:
If you have sagging skin, wrinkles, scars, large pores, age spots, and various moles at the same time, carbon dioxide fractional laser can be said to be the most cost-effective medical beauty project.
Fractional laser treatment of acne scars:
Related studies have shown that the use of non-ablative fractional lasers to treat skin lesions in patients with scars has shown a significant improvement trend, and patients only experience slight pain after surgery, with high postoperative satisfaction.
Treatment cycle
How long does fractional laser treatment last?
Since there is intact skin between the pores, the skin recovers quickly and normal life will not be affected after treatment. The punctate scabs will naturally fall off after 5-7 days;
Therefore, fractional laser not only has the rapid and significant effects of invasive treatment, but also has the advantages of non-invasive treatment with less side effects and short recovery time.
Cycle: Treatment once every two and a half months to three months, with 3-5 times as one course of treatment.
Effect
1. Firming and shaping: solve problems such as facial sagging, double chin, blurred jawline, and drooping eyes
2. Quick wrinkle removal: forehead wrinkles, fine lines around the eyes, crow's feet, nasolabial folds, perioral wrinkles, lip wrinkles, neck, and other wrinkles
Product Description
It can be very effective in reshaping various types of deformed scars and skin tissue. It provides users with a variety of treatment functions, and the operating medical staff can easily perform the following laser beauty treatments:
|
Basic parameters of dot matrix mode |
|
|
Scanning method |
Order/intermediate/disordered |
|
Scanning graphics |
Square/circle/hevagon/triangle/interface/hand-drawn custom graphics |
|
Graphic size |
0.1*0.1mm-20*20mm |
|
Scan time |
1-10ms |
|
Point spacing |
0.1mm-2mm |
|
Stop |
O-10ms |
|
Point energy |
1mj-400mj |
|
Interval |
1-9s |
|
Scanning manual tool function |
Deep peeling, micro peeling, non-peeling |
|
Basic parameters of pulse mode |
|
|
Pulse width |
1ms-200ms |
|
Interval |
5-100ms |
|
Pulse mode |
Long pulse/super pulse |
|
Laser output method |
Single/continuous |
|
Basic parameters of private/vulvar mode |
|
|
Stop |
0.1ms-9.9ms |
|
Private/Vulva Point Spacing |
0.1mm-1.2mm/0.1mm-1.0mm |
|
Repeat Time |
1-10 |
|
Smart Vals |
0.1s-2.0s |
|
Output shape |
Square/circle |
|
Lens method |
360°C/45℃ |
|
Size |
57×57×130CM |
|
Gross weight |
60KG |
Multiple therapeutic functions
It provides users with a variety of treatment functions, and medical staff can easily perform the following laser beauty treatments:
Fractal mode
Remove wrinkles: wrinkles on the hands, neck, and face (especially wrinkles around the mouth and orbits), reduce deeper forehead wrinkles and stretch marks
Remove scars and acne, especially acne scars, traumatic scars, postoperative scars, and frostbite scars
Improve chloasma and treat superficial pigmentary diseases such as freckles, coffee spots, age spots and other pigmentary diseases
Improve photoaging skin and enlarged pores, and thicken the dermis
Privacy: 360-degree circular emission technology, no omissions, no dead angles, more efficient and safer
Modulated pulse mode
Cutting and vaporizing skin growths, such as warts, moles, actinic keratosis, seborrheic keratosis, sebaceous
adenoma, syringoma, remove eye bags, hemangioma, red blood streaks, etc.

Features of fractional laser
Fractional laser treatment uses laser to evenly make tiny holes on the skin, which then causes a series of skin biochemical reactions to achieve the effects of skin tightening, wrinkle removal, skin rejuvenation and spot removal. Since fractional laser treatment only covers part of the skin tissue and the newly made holes do not overlap each other, part of the normal skin is retained, which speeds up recovery. Patients can return to normal life after 4-5 days. The treatment itself is relatively safe and can treat any part of the body. It is a minimally invasive treatment between invasive and non-invasive treatments.
It has the dual effects of immediate gasification and skin tightening and long-term stimulation of collagen proliferation.
It fully achieves the effect of traditional peeling treatment.
It greatly shortens the recovery time after treatment.
Accurately adjust the size, density, shape, scanning mode, and penetration depth of the scanning pattern to meet the needs of various diseases.
Four modes, eight functions

Private Laser
360° circular transmission technology, no omissions, no blind spots, more efficient and safer
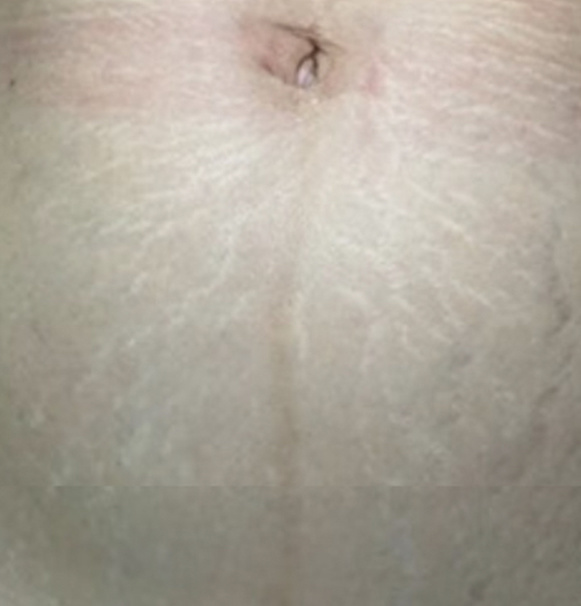 |
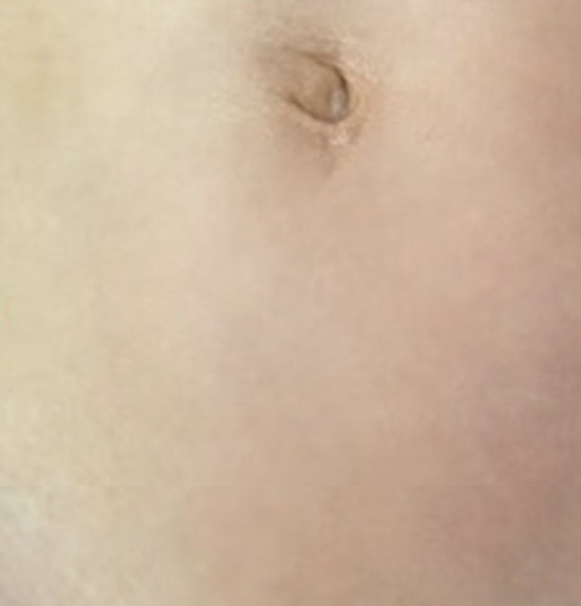 |
| Before | After |
High Energy Pulse
Foreskin, moles, and tumors
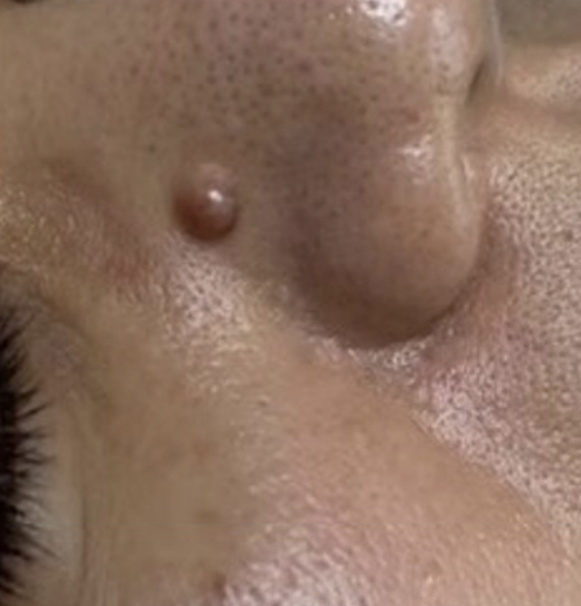 |
 |
| Before | After |
Table Parameters
|
Name |
Fractal laser parameters |
|
Screen |
10.4-inch smart color touch screen |
|
Wavelength |
10.6 microns±0.1 microns |
|
|
Dot matrix mode/pulse mode (long pulse and ultra |
|
Cooling system |
Air cooling |
|
Optical guide system |
7-joint optical guide arm |
|
Indicator light wavelength |
635 nanometers |
|
Spot size |
≥0.1 mm focal spot |
|
Operating voltage |
AC 220V, 110V±10%, 50Hz |
|
Laser power |
1-40w (actual≥40w) |
|
Scanning mode |
Order/Intermediate/Disordered |
|
Operating temperature |
5°C-40°℃ |
|
Relative operating humidity |
≤80% |
|
Atmospheric pressure range |
700Hpa --1060Hpa |
|
Size |
57×57×130CM |
|
Gross weight |
60KG |
Boot and main interface
Turn on the key switch and emergency stop, the screen enters the boot screen, and automatically jumps to the main interface within 2 seconds, as shown below
Splash Screen
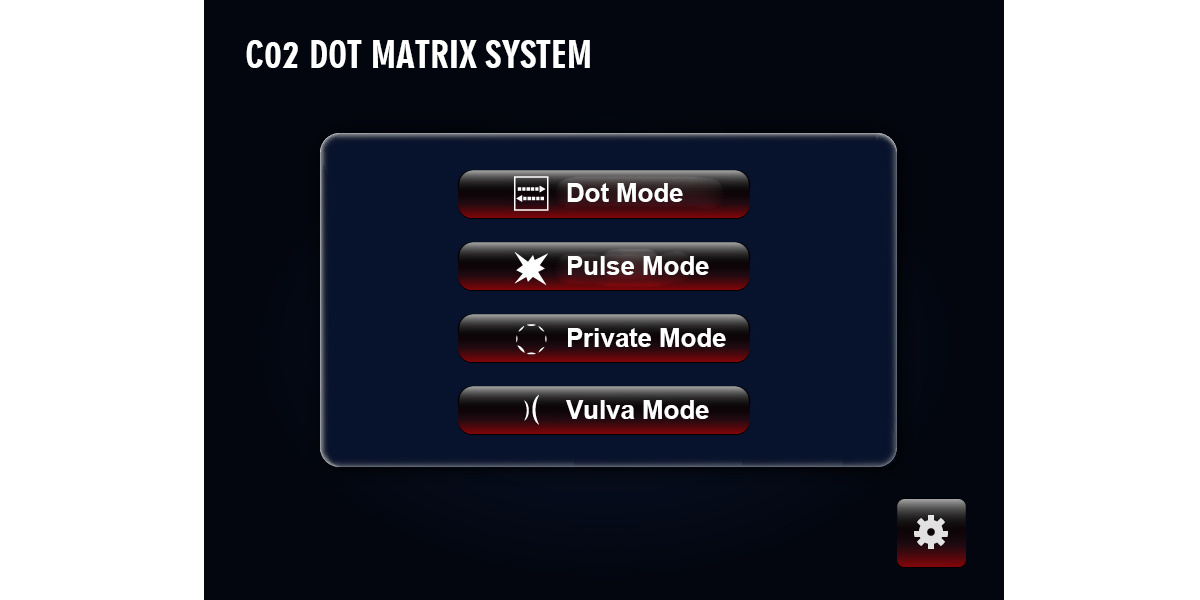
The main interface includes four function options: dot matrix mode, pulse mode, private mode, and vulva mode, as well as a system setting key. Select different keys to enter the corresponding function.
Main Interface
Dot Matrix Mode
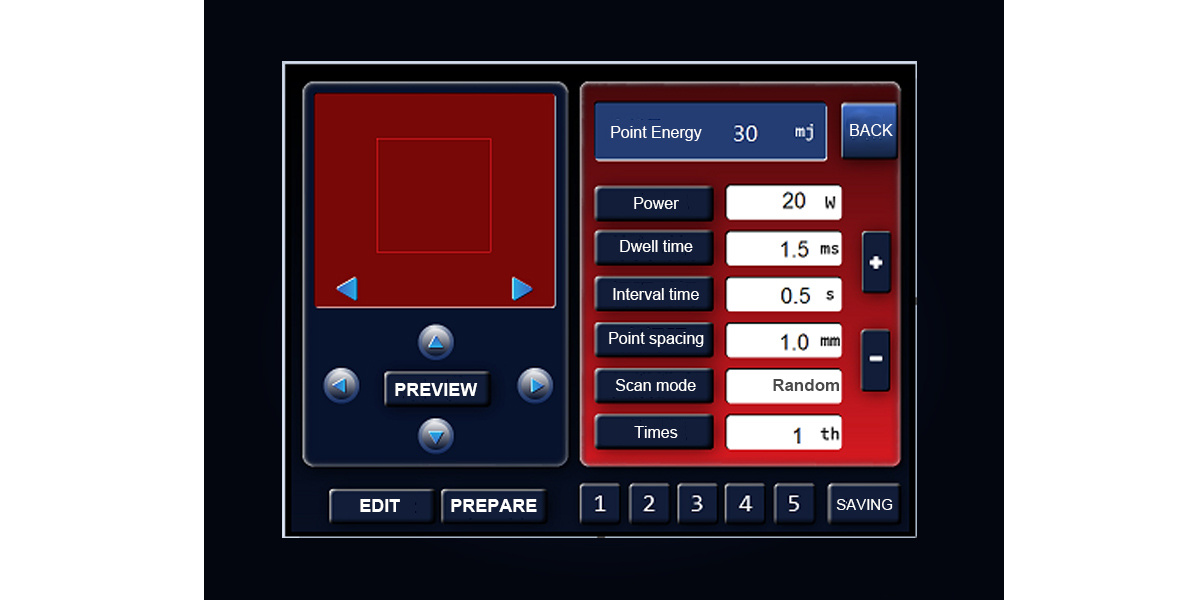
The dot matrix function mainly includes basic graphic selection, parameter saving and reading, graphic size adjustment, power adjustment, dot spacing adjustment, dot dwell time adjustment, scan mode adjustment, power adjustment, scan times and interval time adjustment, as shown in the figure below.
1. Basic graphic selection
Including five graphics: square, circle, triangle, hexagon, and ellipse. Click the left and right arrow keys on both sides of the graphic to select the desired graphic. The selected graphic is displayed in the main display frame.
2. Parameter saving function
Including 1-5 numeric keys and save. When saving parameters, press a numeric key first, then adjust other parameters. When pressing save, the numeric key saves all current parameters.
3. Reading function
When reading parameters, press any numeric key, and the parameters saved last time with this numeric key will be called out, overwriting all current parameters. If you do not select any numeric key after entering this interface, the parameters displayed on the interface at this time are the parameters when you last exited this interface.
4. Point energy
It is the average energy of each point in the dot matrix mode, which is the product of laser power and point dwell time. The adjustment of point energy is adjusted by point dwell time. The greater the point dwell time, the greater the point energy.
5. Graphic size adjustment
It is used to adjust the size of the basic graphics. The height Y adjustment range is 1mm-20mm, the height X adjustment range is 1mm-20mm, and the step is 1mm.
6. Power adjustment
Adjust the laser power, 1W to 30W adjustable (40W, 50W, 60W optional), step 1W. (Depending on the type of laser, there are two ways to control the laser power, namely the analog voltage signal for glass tube laser power control (the power is controlled by the level) and the PWM control signal for solid RF laser (the power is controlled by the PWM signal duty cycle)).
7. Dot spacing adjustment
Used to adjust the spacing of the dots in the current figure, the adjustment range is 0.1mm-2mm, step 0.1mm. The smaller the dot spacing, the greater the density of the dots.
8. Dot dwell adjustment
Used to adjust the action time of the laser on each dot. The longer the time, the more energy the laser has on each dot. The adjustment range is 0-10ms, and the step is 0.1ms.
9. Scan mode selection
(Sequential, center-point, random 3 dot-marking methods)
① Sequential scanning mode: When dotting, scan from the first vertex of the dot matrix figure to the end point in sequence.
② Center-division scanning mode: When dotting, the dot matrix pattern is divided into four quadrants from the middle. The dotting method is to first dot the first dot in each quadrant in sequence, then dot the second dot in the four quadrants in sequence, until the last dot in each quadrant is done.
③ Random scanning mode: When dotting, the dot matrix pattern is scanned in a random order.
10. Scan times adjustment
It is used to adjust the dotting times of the dot matrix pattern. All the dots in the pattern are completed as a complete dotting. The adjustment range is 1-10 times.
11. Interval time adjustment
It is used to adjust the interval time between two adjacent complete dotting processes when the number of scans is greater than 1 time. The adjustment range is 0.1S-2S, and the adjustment range is 0.1S.
12. Edit key
The system parameters can only be adjusted when the edit key is pressed. When the preview and preparation are pressed, the editing state automatically exits, that is, the system parameters cannot be adjusted at this time, and the edit key is automatically lifted to a non-pressed effect.
13. Preview key
When the preview key is pressed, the system exits the parameter adjustable state and enters the preview mode. At this time, the dot matrix handpiece scans the outline of the current figure. This outline is the outline of the laser action range when dotting. The user uses this outline to determine the position of the scanning handpiece on the patient's skin.
14. Preparation key
When the preparation key is pressed, the system exits the parameter adjustable state and enters the preview and preparation mode. Only when the foot switch is closed in the preparation mode will the laser emit light and the system will dot. When the foot pedal is lifted during a complete dotting process, the system will continue the interrupted dotting process when the foot pedal is closed again to complete the remaining dotting process.
15. Return key
Press the return key to exit the current interface and return to the previous interface.
Pulse Mode
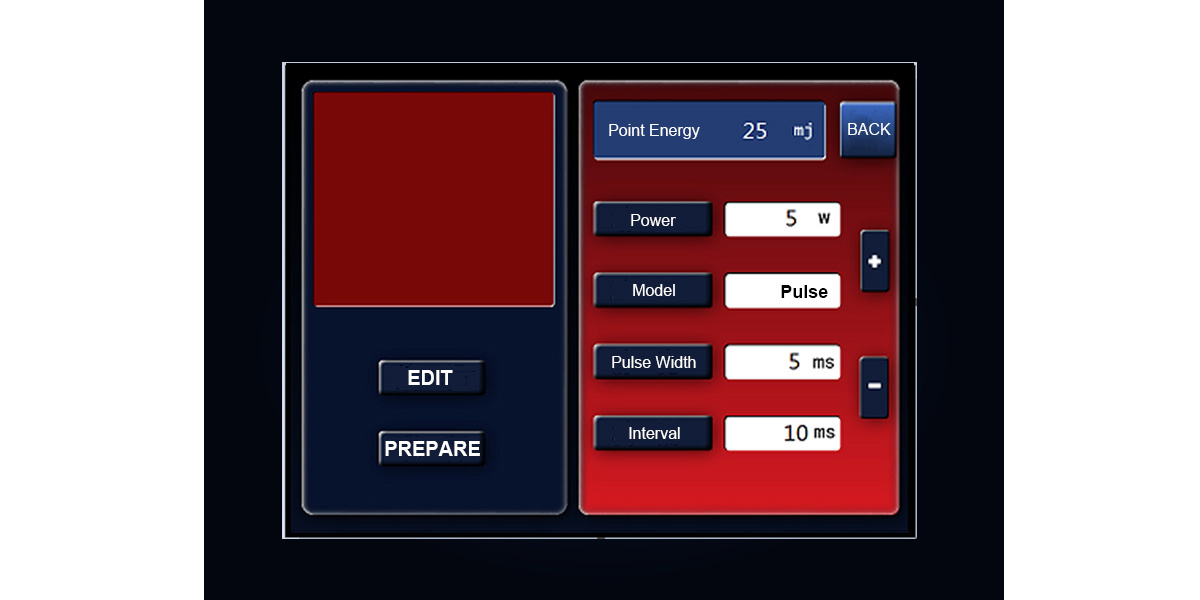
The super pulse/pulse function includes laser control signal waveform simulation, laser mode selection, pulse width adjustment, power adjustment, and interval time adjustment. As shown below
1. Laser control signal waveform simulation
The simulation displays the signal form of the current laser control, and simulates and displays information such as pulse width and interval time. This system uses an envelope structure laser control signal. The period of the control signal has been set (pulse mode is 3.5KHz, super pulse is 100KHz), which is not adjustable by the user, that is, the period and pulse width of a single laser control signal are not adjustable by the user. The user-adjustable pulse width is the action time and interval time of each group of laser beams. In fact, each light emission contains several or dozens of hundreds of laser small cycles. Power regulation is to adjust the level of the analog voltage power control signal and the duty cycle of a single cycle of the PWM control signal.
2. Mode selection
Including pulse mode, super pulse mode, single and continuous. Among them, pulse and super pulse are two working modes of the laser. In pulse mode, the laser emits laser in the form of pulses, and the pulse width of each light emission is longer. The operating frequency is lower than the super pulse mode. It is the most commonly used working mode of the laser. The super pulse mode is a laser working mode with a faster frequency and narrower pulse width. Because of the faster frequency and narrower pulse width, the laser pulses emitted by the laser in the super pulse mode are shorter, more energetic, and more penetrating. However, not all lasers can reach the light emission frequency of the super pulse mode, that is, not all lasers can respond under high-frequency control signals.
3. Point energy
It is the energy value of a group of laser beams of the laser, which is equal to the product of power and pulse width.
4. Pulse width
It is the action time of each group of laser beams, which contains many single laser cycles during this action time. The pulse width range is 0.1S-2S, and users can distinguish the time of this pulse width, while a single laser cycle is millisecond time, which users cannot distinguish.
5. Interval time
It is the time interval between each group of laser beams. When this interval time is reduced to 0, that is, there is no interval time between each group of laser beams, and the laser continues to work in laser mode (power adjustment is effective at this time, for example, when the power is 15W, select continuous mode, and the system will continuously emit light at a power of 15W).
6. Power
Adjust the laser power, 1W to 30W (optional 40W, 50W, 60W), step 1W.
7. Ready key
When the ready key is pressed, the system exits the parameter adjustable state and enters the ready mode. The laser will only emit light when the foot switch is closed in the ready mode. Press the ready key again, the system exits the ready mode and enters the parameter editable state.
8. Return key
Press the return key to exit the current interface and return to the previous interface.
Private Mode
When using the private mode, please use the private handpiece, and the focal length is 152mm. The private functions mainly include basic graphic selection, line number adjustment, dot spacing adjustment, dot dwell time adjustment, power adjustment, scan times and interval time adjustment. As shown below
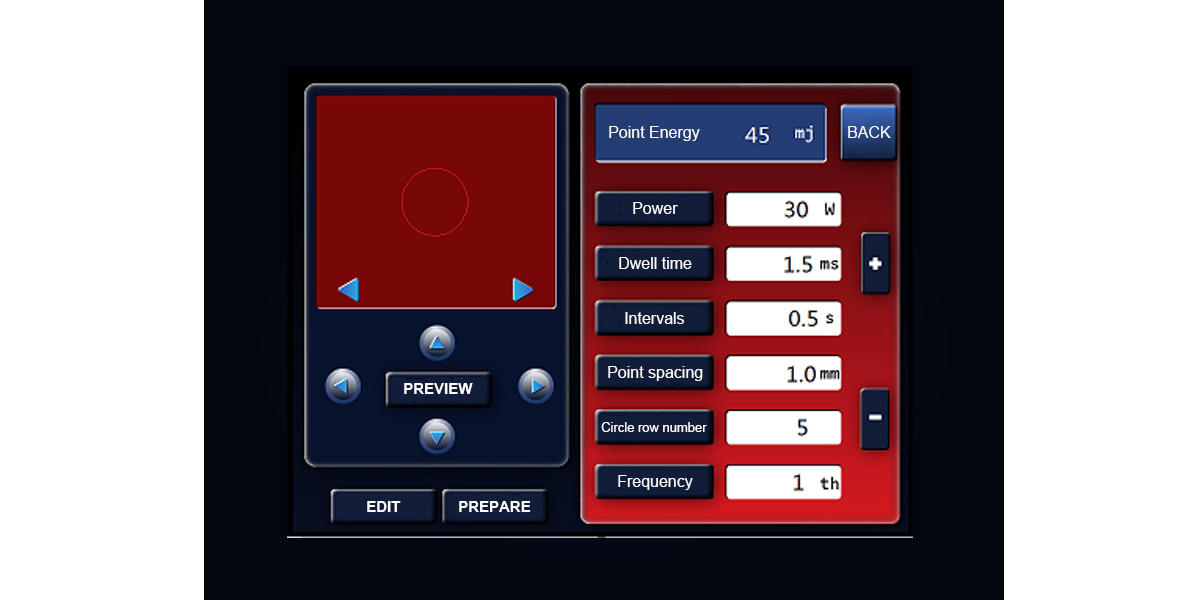
1. Basic graphic selection
Including square and circle. The square needs to be used with a 45° elliptical reflective surface, and the circle needs to be used with a conical reflective surface.
2. Point energy
It is the average energy of each point in the dot matrix mode, which is the product of the laser power and the point dwell time. The adjustment of the point energy is adjusted by the point dwell time. The longer the point dwell time, the greater the point energy.
3. Row number adjustment
Adjustable only in circle. Only used to adjust the number of dot rows in circle, which can also be considered as the number of rings in the circle. The adjustment range is 1-9 rows.
4. Row number of dots adjustment
Adjustable only in circle. Used to adjust the number of dots per row (circle) in circle, the adjustment range is 20-120 dots. The more dots, the greater the density of dots.
5. Row spacing adjustment
Only used to adjust the spacing of dots in the square, the adjustment range is 0.1mm-1mm, step 0.1mm. The smaller the dot spacing, the greater the density of dots.
6. Dot dwell adjustment
Used to adjust the action time of the laser on each dot. The longer the time, the more energy the laser acts on each dot. The adjustment range is 0-10ms, and the step is 0.1ms.
7. Power adjustment
Adjust the laser power, 1W to 30W adjustable (optional 40W, 50W, 60W), step 1W.
8. Scan times adjustment
Used to adjust the number of dot patterns, all dots in the pattern are marked as a complete dot. The adjustment range is 1-10 times.
9. Interval time adjustment
Used to adjust the interval between two adjacent complete dot processes when the number of scans is greater than 1. The adjustment range is 0.1S-25S, and the adjustment range is 0.1S.
10. Displacement
Used to adjust the position of the red light and laser in the field of view, so that the pattern is in the center of the field of view, divided into four directions of up, down, left and right.
11. Edit key
When the edit key is pressed, the system parameters can be adjusted. When the preview and preparation are pressed, the editing state automatically exits, that is, the system parameters cannot be adjusted at this time, and the edit key is automatically lifted to a non-pressed effect.
12. Preview key
When the preview key is pressed, the system exits the parameter adjustable state and enters the preview mode. At this time, the dot matrix handpiece scans the outline of the current figure. This outline is the outline of the laser action range when dotting. The user uses this outline to determine the position of the scanning handpiece on the patient's skin.
13. Preparation key
When the preparation key is pressed, the system exits the parameter adjustable state and enters the preview and preparation mode. Only when the foot switch is closed in the preparation mode will the laser emit light and the system will dot. When the foot pedal is lifted during a complete dotting process, the system will continue the interrupted dotting process when the foot pedal is closed again.
14. Return key
Press the return key to exit the current interface and return to the previous interface.
Vulva Mode
When using the external mode, please use the external hand tool, and the focal length is 152mm. The external functions mainly include basic graphic selection, line spacing adjustment, point dwell time adjustment, power adjustment, scanning times and interval time adjustment. As shown below
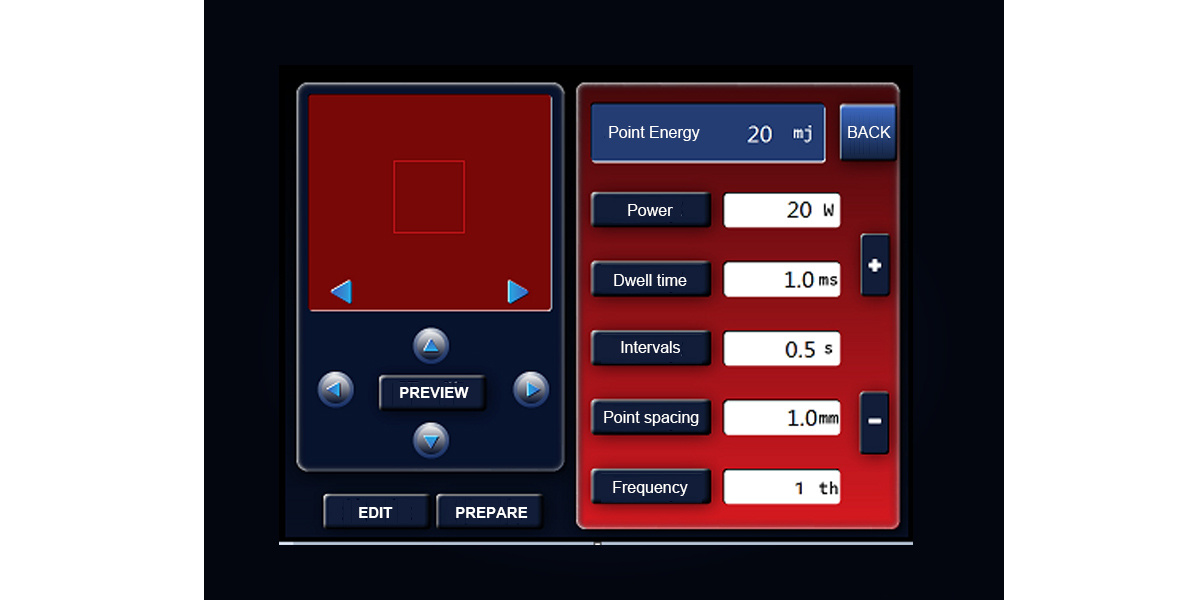
1. Basic graphic selection
Including square and circle.
2. Dot energy
It is the average energy of each dot in the dot matrix mode, which is the product of laser power and dot dwell time. The adjustment of dot energy is adjusted by dot dwell time. The longer the dot dwell time, the greater the dot energy.
3. Dot dwell adjustment
It is used to adjust the action time of the laser on each dot. The longer the time, the more energy the laser has on each dot. The adjustment range is 0-10ms, and the step is 0.1ms.
4. Power adjustment
Adjust the laser power, 1W to 30W adjustable, step 1W.
5. Scan times adjustment
It is used to adjust the number of dot-matrix graphics. All the dots in the graphics are marked once. The adjustment range is 1-10 times. When 10 times is selected, the system is infinitely marked, that is, if the pedal is not lifted after stepping on it, it will keep marking.
6. Interval time adjustment
It is used to adjust the interval between two adjacent complete dot-matrix processes when the number of scans is greater than 1 time. The adjustment range is 0.1S-2S, and the adjustment range is 0.1S.
7. Displacement
It is used to adjust the position of the red light and laser in the field of view so that the graphics are in the center of the field of view. It can be adjusted in four directions: up, down, left, and right.
8. Edit key
When the edit key is pressed, the system parameters can be adjusted. When the preview and preparation are pressed, the editing state automatically exits, that is, the system parameters cannot be adjusted at this time, and the edit key is automatically lifted to a non-pressed effect.
9. Preview key
When the preview key is pressed, the system exits the parameter adjustable state and enters the preview mode. At this time, the dot matrix handpiece scans the outline of the current graphic. This outline is the outline of the laser action range when dotting. The user uses this outline to determine the position of the scanning handpiece on the patient's skin.
10. Preparation key
When the preparation key is pressed, the system exits the parameter adjustable state and enters the preview and preparation mode. Only when the foot switch is closed in the preparation mode will the laser emit light and the system will dot. When the foot pedal is lifted during a complete dotting process, the system will continue to complete the remaining dotting process when the foot pedal is closed again.
11. Return key
Press the return key to exit the current interface and return to the previous interface.
Password and alarm screen
Click the gear-shaped setting button in the lower right corner of the main interface to enter the password page. Enter 123456 to confirm and enter the setting interface as follows:
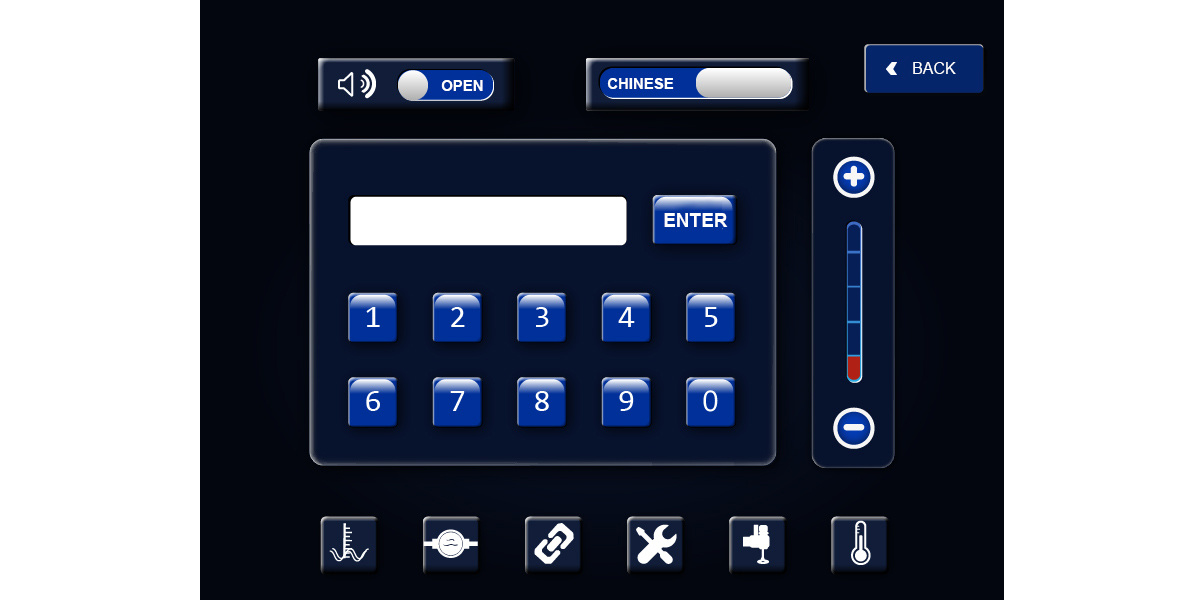
1. Password unit
Enter 123456 to enter the settings page.
2. Sound switch
Responsible for turning on and off the buzzer prompt sound on the control board.
3. Chinese and English
Click to switch between Chinese and English.
4. Red light adjustment
Responsible for adjusting the red light brightness, 5 levels adjustable.
5. Alarm prompt icon
When a system failure occurs, the corresponding alarm icon will light up, please contact the manufacturer for processing.
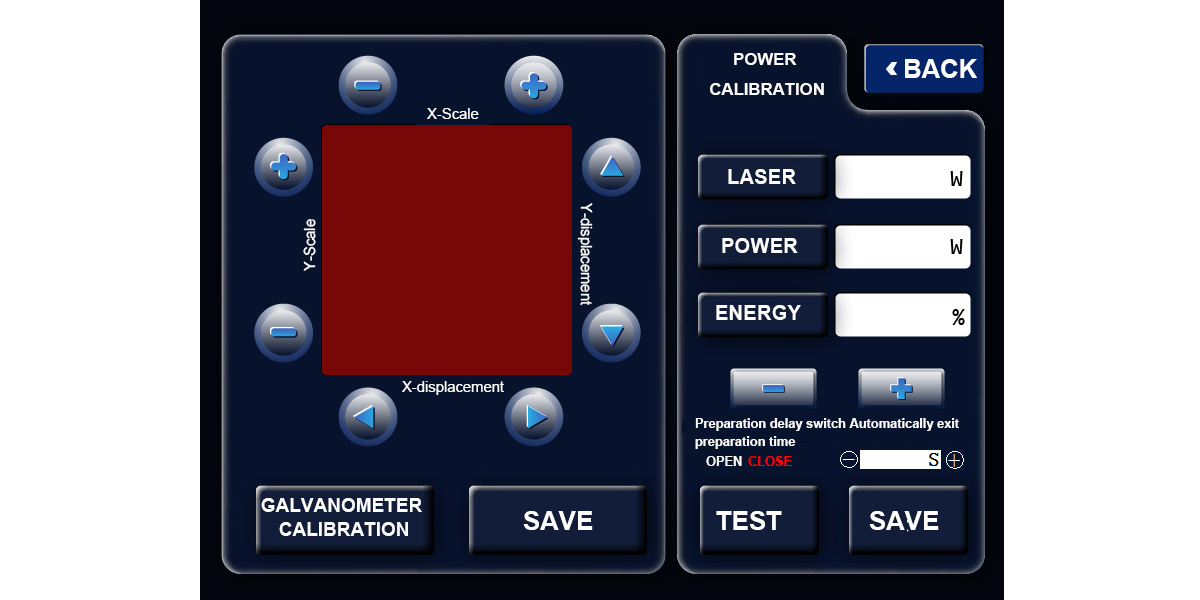
Set interface
Please note that the parameters in the setting interface should not be tampered with, and non-professionals should not touch it.
The setting interface is mainly divided into handpiece proportional position calibration and power calibration. If necessary, please contact the manufacturer for guidance. Do not operate without permission.
RELATED PRODUCTS
MESSAGE

